
Sending e-mails is simple nowadays, but can become a bit tricky when it comes to authenticating. Using basic authentication, all you need is a user and a password and you are set. However, when you decide to use OAuth, you have to perform some extra steps.
There are many OAuth flows out there, so it can be a little intimidating to find out which one to use. Here you can find a good guide on how to decide it, but for this tutorial, as we do not want to involve a user at all, we will use the Client Credentials Flow. It is a server-to-server flow, where secrets are exchanged for an access token.
Requisites
You must have a GSuite account, as we will need to use a feature called Domain-wide delegation, a feature that enables our account to impersonate another user. There is a catch: it is not free, you can check the pricing here.
Full code
If you are just for a code example, you can find it on this GitHub repository.
Creating a service account
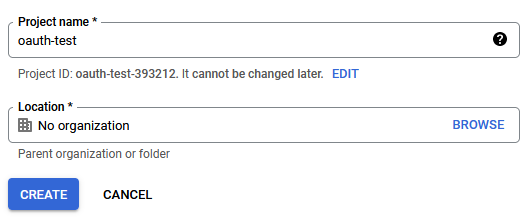
We shall begin by creating a new project, but you are free to use an existing one if you’d like. Navigate to https://console.cloud.google.com and create a new project.
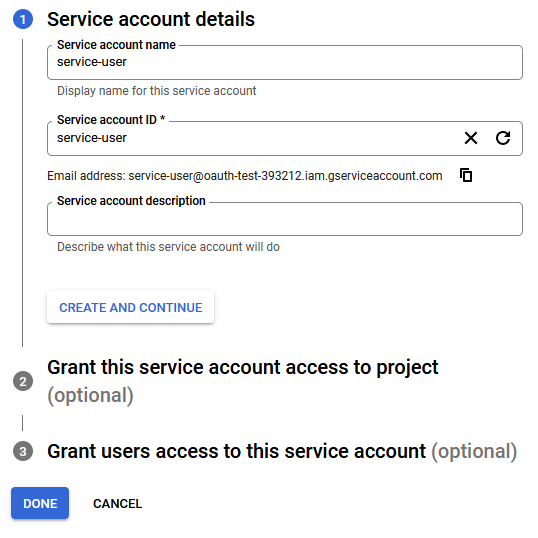
Once that’s created, we need to create a service account. A service account is an account that belongs to your application instead of an individual end user. In order to do so, navigate to “IAM & Admin” > Service accounts and click on “Create service account” (or follow this link). Choose a name for it and press “Done”.
You will be taken back to the service accounts list page. Select your newly created account, choose the “Keys” tab, and add a new JSON key. A file that allows access to your cloud resources will automatically be downloaded to your disk, so be sure to store it somewhere safe and do not lose it.
Domain-wide account delegation
Now that we have our service account created, it’s time to use domain-wide delegation and give it all the special permissions that it needs. As we mentioned before, this account will have privileges to impersonate any other account in the same project.
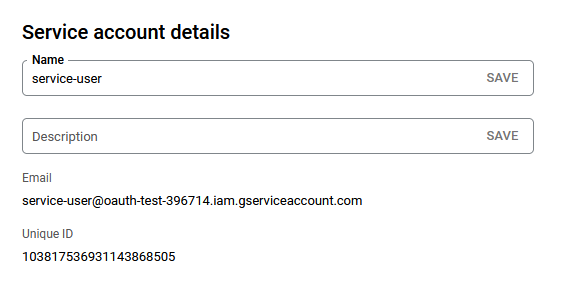
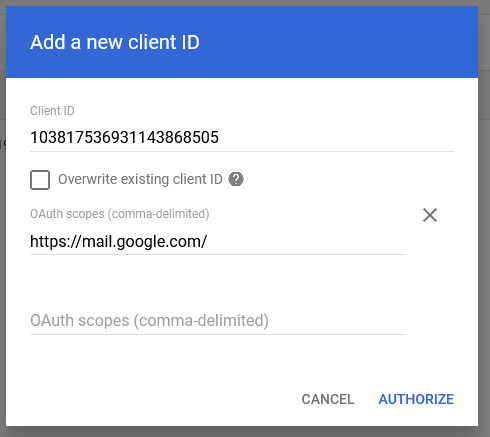
Open https://admin.google.com, then navigate to Security > Access and data control > API controls. Next, go to API clients, and click on Add new. On the window, add the Client ID from the service account you created. This ID can be found in multiple places, such as the JSON file with the secrets, and also in the details page of your service account.
Finally, specify which scopes this account will have permission to. For our example, we will only need the https://mail.google.com/ scope. So fill that in, and click on “Authorize”.
Creating and authenticating a JWT using Gmail REST endpoints
It’s good to know that Google provides its own library for authentication, which might make your life easier. But, in case you do not want to rely on it, we can obtain the access token by generating and authenticating a JSON Web Token (JWT) through REST endpoints. A JWT is, according to jwt.io, an open standard (RFC 7519) that defines a compact and self-contained way for securely transmitting information between parties as a JSON object.
It’s also important to know that the code we’ll create in this article is merely a proof of concept. For example, we will not be properly handling HttpClients, which could lead to some issues, as you can read in a previous article. Also, we won’t be doing any exception handling at all. So please refine this code before using it for production, or else you might yourself working overtime on a Friday.
To achieve our goal, we will use two libraries: MailKit and JWT.Net. Assuming you already have a project created, install these dependencies by running these commands:
Install-Package MailKit
Install-Package JWT
Now then, let’s get coding! First, let’s create a list of the variables that we shall be using through the code.
var subject = "henrique@intodot.net";
var privateKey = "-----BEGIN PRIVATE KEY-----\nVERYLONGSTRING\n-----END PRIVATE KEY-----\n";
var clientX509CertUrl = "https://www.googleapis.com/robot/v1/metadata/x509/someinfo";
var tokenUri = "https://oauth2.googleapis.com/token";
var issuer = "service-user@project.iam.gserviceaccount.com";
var scope = "https://mail.google.com/";
var audience = "https://oauth2.googleapis.com/token";
var apiKey = "your key";
- subject: the e-mail of the user we are impersonating
- privateKey: the private key used to sign our JWT. It’s the “private_key” field in our secrets.json file
- clientX509CertUrl: the link where we can download the certificate used to sign the JWT. It’s the “auth_provider_x509_cert_url” field in our secrets.json file
- tokenUri: the endpoint that we shall use to exchange a JWT for an access token. It’s the “token_uri” field in our secrets.json file.
- issuer: identifies the party that issued the JWT. It’s the “client_email” field in our secrets.json file
- scope: the list of permissions we are requesting. Ideally, we should be requesting as little access as possible. In this case, we will need only “https://mail.google.com/”, but more can be found here.
- audience: uniquely identifies the intended recipients of this JWT. It’s the “token_uri” field in our secrets.json file
- apiKey: since our service account might have multiple keys, we need to specify the one we are using. It’s the “private_key_id” field in our secrets.json file.
For more details on the JWT fields, you can download and read the JWT Handbook, provided for free here.
Creating the JWT payload
For the payload, we will be using a Dictionary<string, object>, since that’s what our JwtEncoder will use later. We are setting an expiration time of 5 minutes, but you can change that to whatever you want. Note that Google won’t generate tokens that last more than one hour.
var payload = new Dictionary<string, object>()
{
    {"iss", issuer },
    {"scope", scope },
    {"aud", audience },
    {"sub", subject },
    {"iat", DateTimeOffset.UtcNow.ToUnixTimeSeconds() },
    {"exp", DateTimeOffset.UtcNow.AddMinutes(5).ToUnixTimeSeconds() }
};
Fetching the remote certificate
Before we encode our JWT, we need to fetch our certificate. We can do so by issuing a GET request to the certificate endpoint we mentioned earlier, and then finding the correct entry in the response. Once we find it, we can extract the bytes and generate an X509Certificate2.
using var httpClient = new HttpClient();
var certificateResponse = await httpClient.GetAsync(clientX509CertUrl);
var certificateResponseContent = await certificateResponse.Content.ReadAsStringAsync();
var certificates = certificateResponseContent.Split(',');
X509Certificate2 certificate = default;
foreach (var certificateString in certificates)
{
    if (!certificateString.Contains(apiKey))
        continue;

    var certificateData = Regex.Match(certificateString, @"(?<=:\s?"").*(?="")").Value;
    certificate = new X509Certificate2(GetBytesFromPem(certificateData, "CERTIFICATE"));
    break;
}

byte[] GetBytesFromPem(string pemString, string keyword)
{
    var header = $"-----BEGIN {keyword}-----";
    var footer = $"-----END {keyword}-----";

    pemString = pemString.Replace("\\n", string.Empty);

    var start = pemString.IndexOf(header) + header.Length;
    var end = pemString.IndexOf(footer, start) - start;

    return Convert.FromBase64String(pemString.Substring(start, end));
}
Encoding the JWT with JWT.Net
Once we have our certificate, we can proceed to signing our JWT. If you are familiar with certificates, this part will be very straightforward. If you are not, you might be wondering why we are creating a second certificate. The thing is, it’s not exactly simple, and if I were to explain it here, it would become a very lengthy article. There’s an answer here that might make things a bit clearer to you.
Moving on, thanks to the JWT.Net library, we can easily encode our JWT by creating a JwtEncoder and calling its Encode method.
var privateKeyBytes = GetBytesFromPem(privateKey, "PRIVATE KEY");
using var rsa = RSA.Create();
rsa.ImportPkcs8PrivateKey(privateKeyBytes, out _);
using var signingCertificate = certificate!.CopyWithPrivateKey(rsa);
var algorithm = new RS256Algorithm(signingCertificate);
var encoder = new JwtEncoder(algorithm, new JsonNetSerializer(), new JwtBase64UrlEncoder());
var encodedJwt = encoder.Encode(payload, privateKeyBytes);
Authenticating the JWT
With the JWT ready in our hands, we need now to check with Google if we’ve done everything right. To do so, we need to send a POST request to the Token URI we mentioned earlier, along with some query parameters, which are specified here. Assuming everything went according to the plan, we should have an access token in the response body.
var uri = new Uri(tokenUri);
uri = AddParameter(uri, "grant_type", "urn:ietf:params:oauth:grant-type:jwt-bearer");
uri = AddParameter(uri, "assertion", encodedJwt);
var authResponse = await httpClient.PostAsync(uri, new StringContent(string.Empty));
var authResponseContent = await authResponse.Content.ReadAsStringAsync();
var googleJwtAuthResponse = JsonSerializer.Deserialize<GoogleJwtAuthenticationResponse>(authResponseContent);
var accessToken = googleJwtAuthResponse.AccessToken;

Uri AddParameter(Uri url, string paramName, string paramValue)
{
    var uriBuilder = new UriBuilder(url);
    var query = HttpUtility.ParseQueryString(uriBuilder.Query);
    query[paramName] = paramValue;
    uriBuilder.Query = query.ToString();

    return uriBuilder.Uri;
}

class GoogleJwtAuthenticationResponse
{
    [JsonPropertyName("access_token")]
    public string AccessToken { get; set; }
}
Connecting to Google’s SMPT and authenticating using OAuth
It’s fairly easy to connect to Google’s SMPT, all we need to do is to create a new SmptClient (be careful to not accidentally use System.Net.Mail instead of MailKit.Net.Smtp), then connect to it. Note that we are using CheckCertificateRevocation = false, but that should definitely not be the case in a production scenario.
After that, we have to create an instance of SaslMechanismOAuth2, using the subject we defined earlier, and the access token we just got from Google. Then we just call the AuthenticateAsync method and voila, we are ready to send spam relevant e-mails!
using var smtpClient = new SmtpClient();
smtpClient.CheckCertificateRevocation = false;
await smtpClient.ConnectAsync("smtp.gmail.com", 465, SecureSocketOptions.SslOnConnect);
var oauth2 = new SaslMechanismOAuth2(subject, accessToken);
await smtpClient.AuthenticateAsync(oauth2);
Sending e-mails through Google’s SMPT
This is the easiest part: all you need to do is create a MimeMessage and send it. A simple example can be found below:
var address = new List<MailboxAddress>() { new MailboxAddress("Henrique", "henrique@intodot.net") };
var message = new MimeMessage(address, address, "Latest ChatGPT leaks", new TextPart() { Text = "https://www.youtube.com/watch?v=dQw4w9WgXcQ" });
await smtpClient.SendAsync(message);