
If you play video games, there is a chance that you at some point had the desire to investigate your own data, either out of curiosity, or maybe to get some insights. When it comes to Riot, there are plenty of pages on the internet that provide such information to you, but why not create your own way of visualizing it? Elasticsearch is a great visualization tool, so let’s see how we can prepare an Elasticsearch server for us to play with.
TL;DR
If you would rather go through the code yourself, you can find it in this repository.
Creating a Riot Development API key
As with most APIs, the first thing we require is an API key. An API key is, as defined by Amazon, a string that API developers use to control access to their APIs. It prevents abuse, adds security, among other benefits. Riot makes it very easy for us to get hold of a temporary key, all we need to do is log in to the developer portal and access the dashboard. There we can generate development API keys that last for 24 hours. After it has expired, all we need to do is to generate a new one.

Setting up Elasticsearch
Our Elasticsearch configuration will be the same as the one we used in a previous article, Creating a Pokedex in Elasticsearch and uploading data with a C# GameBoy emulator.
Consuming Riot’s Developer API
We’ll start by creating our HttpClient, which will handle all requests. First, we set the BaseAddress property, so we don’t repeat it for every request. In this case, we are executing the request against Europe, but you of course can change it to any region you want. Then we set the “X-Riot-Token” default header, so that we include our API key in every single request.
Since we are creating a simple console application, we do not need to worry about handling multiple instances of the HttpClient. However, if you decide to turn this into an ASP.NET app or anything else that requires dependency injection, remember to use IHttpClientFactory AddHttpClient method to avoid Port Exhaustion.
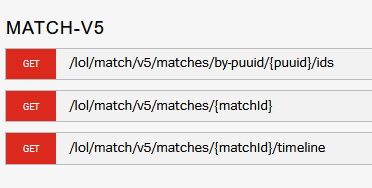
After that, we get the user’s input to find out from which account we should import the matches. We need this information due to how Riot’s API works. If you look at the available Match endpoints, if you want to get a list of matches, we need to specify from which PUUID (Player Universally Unique IDentifiers) they belong. Only after we have the match ID we get specific details about it, such as the game length, date, player info, among others.
The GetAccount method basically gets information from the console window. Then we have the GetPuuidAsync method, which creates a GetAccountDtoRequest method and calls the ExecuteAsync method. The GetAccountDtoRequest class inherits from BaseGetRequest, which provides a couple of neat functionalities, such as error handling with Polly and deserialization of responses with System.Text.Json.
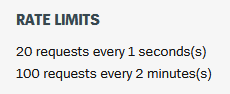
The use of Polly is really important here, due to the API’s rate limits. Rate limiting is a way of protecting an API from fraudulent requests, and also to to prevent it from being overused. Riot allows us to perform 20 requests per second and 100 requests every 2 minutes. Depending on the account we are importing games from, it is not hard for it to have over a hundred played games. I would know it.
Our next step is to get all the matches from that account. The only point of interest here is that we need to make use of the pagination to iterate through all matches. Pagination can be used to avoid overloading the client with huge payloads, and also to protect the server as well.
With all the IDs of all matches at hand, we can start importing them into our Elasticsearch server. In this method, we simply go through the entire list of matches, check which of them are not imported already, and then index them into Elasticsearch. Thanks to Polly, we do not need to worry about performing too many requests here.
Indexing documents into Elasticsearch
In the previous paragraph, we saw that we are calling 2 methods of our MatchIndexer: MatchAlreadyIndexedAsync and IndexAsync. The first one calls the ElasticsearchClient.GetAsync to check if the match we are trying to index is already there. If it is, we can avoid calling the API so that we only perform requests that are actually required, taking a little bit longer for us to blow up our rate limit. Then, once we have the match details, we can call the ElasticsearchClient.IndexAsync method to insert our document in Elasticsearch.
Note that in the constructor we call the CreateIndex method. In this method, we verify if the index that we’re going to use has been created, and, if it hasn’t, we create it. The mappings have been redacted because they ended up being very long, so you can find them in the original file.
Conclusion
We are now ready to run our application (do not forget to run docker compose) and start snooping on our friend’s games. Notice that not all the information we are receiving from the API is imported, such as the items, where we are missing some mapping from the item ids to their names.